Effects of indenter radius on mechanical properties and deformation behavior of cu₅₀zr₅₀ metallic glasses in indentation and scratching process
Mechanical properties and deformation
mechanisms are very typical and exceedingly
important factors used to evaluate the characteristics
of the materials. These factors directly influence
the workability of the materials. Therefore, the
investigation and evaluation on the mechanistic
characteristics of materials are very necessary.
Many experimental studies have been conducted
to investigate the mechanical properties and the
deformation mechanism of materials with different
testing methods [1,2]. However, the sizes of the
samples in the experimental studies are still quite
large, in the microscale or macroscale. In order
to assess the properties of materials more deeply
and more accurately, the size of the material has
been reduced to nanoscale. The nanoscale is a
major barrier for the performing of experimental
studies, requiring an alternative method. With
the strong development of computer technology,
molecular dynamics (MD) simulation method is
an appropriate choice in simulating and evaluating
the properties of nanomaterials. MD simulation
method is simple and accurate in conducting the
simulations with the testing processes are diverse
such as shear, compression, indentation, tension,
scratching, cutting, and so on.
In the modern industrial age today, MGs
are widely used [3]. One of the most popular
MGs systems is copper MGs type. Many systems
of copper MGs have been created to study the
structural, dynamic properties such as Cu-Mg [4],
Cu-Zr [5], Cu-Ta [6], Cu-Ni [7]. Among these
copper MGs systems, Cu–Zr MGs has emerged
as the promising immiscible alloy systems for
applications in electrical engineering, magneticsensing, chemical, and structural materials. The
indentation and scratching processes are usually
performed to study the mechanical properties and
deformation mechanisms of materials, however,
the combination of these two processes is scarce,
especially with Cu-Zr MGs.
In this work, the mechanical properties and
deformation mechanisms of Cu
50Zr50 MGs systems
are analyzed and evaluated through the combination
of indentation and scratching processes using MD
simulation. The machining processes are simulated
with different indenter radius. The results will
supply a more penetrating understanding of the
mechanistic abilities of Cu
50Zr50 MGs.
Trang 1
Trang 2
Trang 3
Trang 4
Trang 5
Trang 6
Tóm tắt nội dung tài liệu: Effects of indenter radius on mechanical properties and deformation behavior of cu₅₀zr₅₀ metallic glasses in indentation and scratching process
 ISSN 2354-0575
 EFFECTS OF INDENTER RADIUS ON MECHANICAL PROPERTIES
 AND DEFORMATION BEHAVIOR OF Cu50Zr50 METALLIC GLASSES
 IN INDENTATION AND SCRATCHING PROCESS
 Anh-Son Tran1, Phan Thi Ha Linh1, 2*
 1 Hung Yen University of Technology and Education
 2 Hanoi University of Science and Technology
 * Email: halinhcokhi@gmail.com
 Received: 02/08/2019
 Revised: 22/08/2019
 Accepted for publication: 10/09/2019
Abstract:
 In this paper, a combination between the indentation and scratching process was developed to analyze
the deformation mechanisms and mechanical properties of Cu50Zr50 metallic glasses (MGs) using molecular
dynamics (MD) simulation. The deformation mechanisms and mechanical properties of Cu50Zr50 MGs are
appraised through the surface morphology, pile-up height, hardness, machining forces, and resistance
coefficient. The influences of different indenter radius are clearly investigated. The results exhibit that
the machining zone increases as increasing indenter radius. The pile-up height and hardness reduce with
a bigger radius of the indenter. The hardness values range from 7.94 to 13.33 GPa. The forces increase,
however, the resistance coefficient decreases as the indenter radius increases.
Keywords: Cu50Zr50 MGs; indentation; scratching; resistance coefficient.
1. Introduction In the modern industrial age today, MGs
 Mechanical properties and deformation are widely used [3]. One of the most popular
mechanisms are very typical and exceedingly MGs systems is copper MGs type. Many systems
important factors used to evaluate the characteristics of copper MGs have been created to study the
of the materials. These factors directly influence structural, dynamic properties such as Cu-Mg [4],
the workability of the materials. Therefore, the Cu-Zr [5], Cu-Ta [6], Cu-Ni [7]. Among these
investigation and evaluation on the mechanistic copper MGs systems, Cu–Zr MGs has emerged
characteristics of materials are very necessary. as the promising immiscible alloy systems for
Many experimental studies have been conducted applications in electrical engineering, magnetic-
to investigate the mechanical properties and the sensing, chemical, and structural materials. The
deformation mechanism of materials with different indentation and scratching processes are usually
testing methods [1,2]. However, the sizes of the performed to study the mechanical properties and
samples in the experimental studies are still quite deformation mechanisms of materials, however,
large, in the microscale or macroscale. In order the combination of these two processes is scarce,
to assess the properties of materials more deeply especially with Cu-Zr MGs.
and more accurately, the size of the material has In this work, the mechanical properties and
been reduced to nanoscale. The nanoscale is a deformation mechanisms of Cu50Zr50 MGs systems
major barrier for the performing of experimental are analyzed and evaluated through the combination
studies, requiring an alternative method. With of indentation and scratching processes using MD
the strong development of computer technology, simulation. The machining processes are simulated
molecular dynamics (MD) simulation method is with different indenter radius. The results will
an appropriate choice in simulating and evaluating supply a more penetrating understanding of the
the properties of nanomaterials. MD simulation mechanistic abilities of Cu50Zr50 MGs.
method is simple and accurate in conducting the
simulations with the testing processes are diverse 2. Methodology
such as shear, compression, indentation, tension, The structure of a Cu50Zr50 MGs model at
scratching, cutting, and so on. room temperature is created from the simulation
Khoa học & Công nghệ - Số 23/Tháng 9 - 2019 Journal of Science and Technology 7
ISSN 2354-0575
of melting and quenching process. The isobaric- component) at a heating rate of 2 K/ps. Then, the
isothermal ensemble (NPT) is used, the periodic thermal equilibration process is kept at 2128 K for
boundary conditions (PBCs) are determined in 500 ps. Finally, the model is cooled down to 300 K
three dimensions, and the pressure is conserved at a high cooling rate of 5 K/ps and then equilibrated
at zero during the simulation process. Firstly, the at 300 K for 500 ps.
model is heated up to 2128 K (melting point of Zr
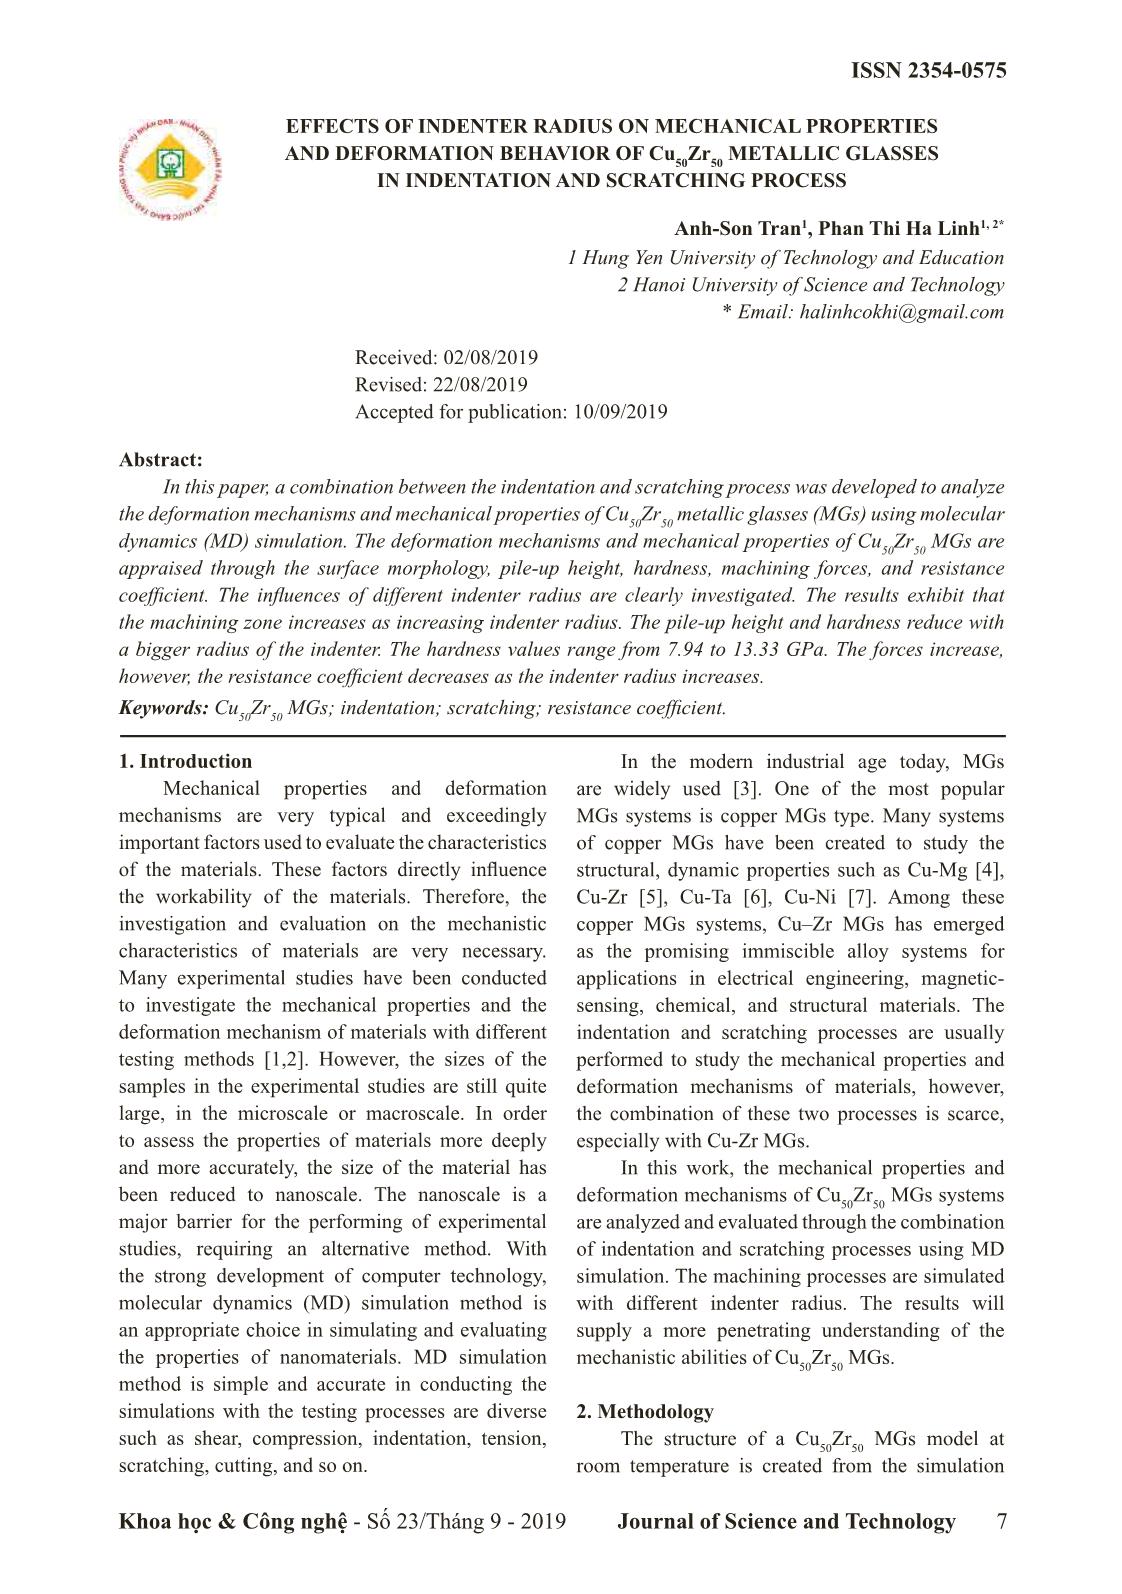
 Figure 1. The Cu50Zr50 MGs model for the indentation, scratching, and retraction system
 Figure 1 shows the Cu50Zr50 MGs model for the the scratching stage is performed with a scratch
machining process. The machining system consists distance of 5 nm and a scratch velocity of 50 m/s
of a sphere diamond indenter and a Cu50Zr50 MGs along the x-axis. Finally, the indenter retracts to the
specimen. The machining process is divided into original position at a retraction velocity of 100 m/s.
three stages including indentation, scratching, and The EAM potential proposed by Mendelev et
retraction. The indenter is considered an ideal rigid al. [8] is employed to depict the interaction between
body to simplify the machining problem and focus Cu and Zr atoms. The atoms interaction between
on the deformation of the Cu50Zr50 MGs specimen. the indenter and Cu50Zr50 MGs is employed by the
The different indenter radius are 1.5, 2.0, 2.5, and Lennard-Jones (LJ) potential [4]. The indenter is set
3.0 nm. The dimensions of Cu50Zr50 MGs specimen as a rigid body, therefore the interaction between C
are 15 nm (length) × 6 nm (height) × 10 nm (width) atoms of the indenter is ignored.
corresponding to x-, y-, and z-axis, respectively. Hardness is a very important factor to evaluate
Three types of atoms are set in the specimen, namely the mechanical properties of materials. The hardness
Newtonian atoms, thermostat atoms, and fixed value (H) is determined as
atoms. The fixed atoms are made up of the four atoms Fmax
 H = (1)
layers. The substrate is fixed in the box by fixing Ac
three layers of substrate atoms at the bottom and where Fmax is the maximum normal force, Ac is the
next to the box margins in x- and z-axis to support contact area between the indenter and specimen in
the whole physical system during the machining the indentation stage. Ac is calculated as
process. The thermostat atoms are also constituted ARcc= r h (2)
of the four atoms layers and placed between the
 where hc is the indentation depth. The resistance
fixed atoms and Newtonian atoms, which are used coefficient (µ) is determined as follows:
to maintain them at a constant temperature of 300 F
 n = t (3)
K by rescaling the velocities of these atoms every Fn
twenty-time steps. PBCs are determined in the x-, where Ft and Fn is the tangential and normal forces
and z-axis, while the free boundary is applied along in the scratching stage, respectively.
y-axis. The NVT (canonical ensemble) is used in The Large-scale Atomic/Molecular Massively
the simulation. The initial distance between the Parallel Simulator (LAMMPS) is employed to
indenter and the surface of the specimen is 1 nm. conduct all MD simulations. The Open Visualization
The machining process begins by the indentation Tool (OVITO) is used to present the processing data
stage with a machining depth of 2 nm and the acquired from MD simulations.
indentation velocity of 50 m/s along y-axis. Then,
8 Khoa học & Công nghệ - Số 23/Tháng 9 - 2019 Journal of Science and Technology
 ISSN 2354-0575
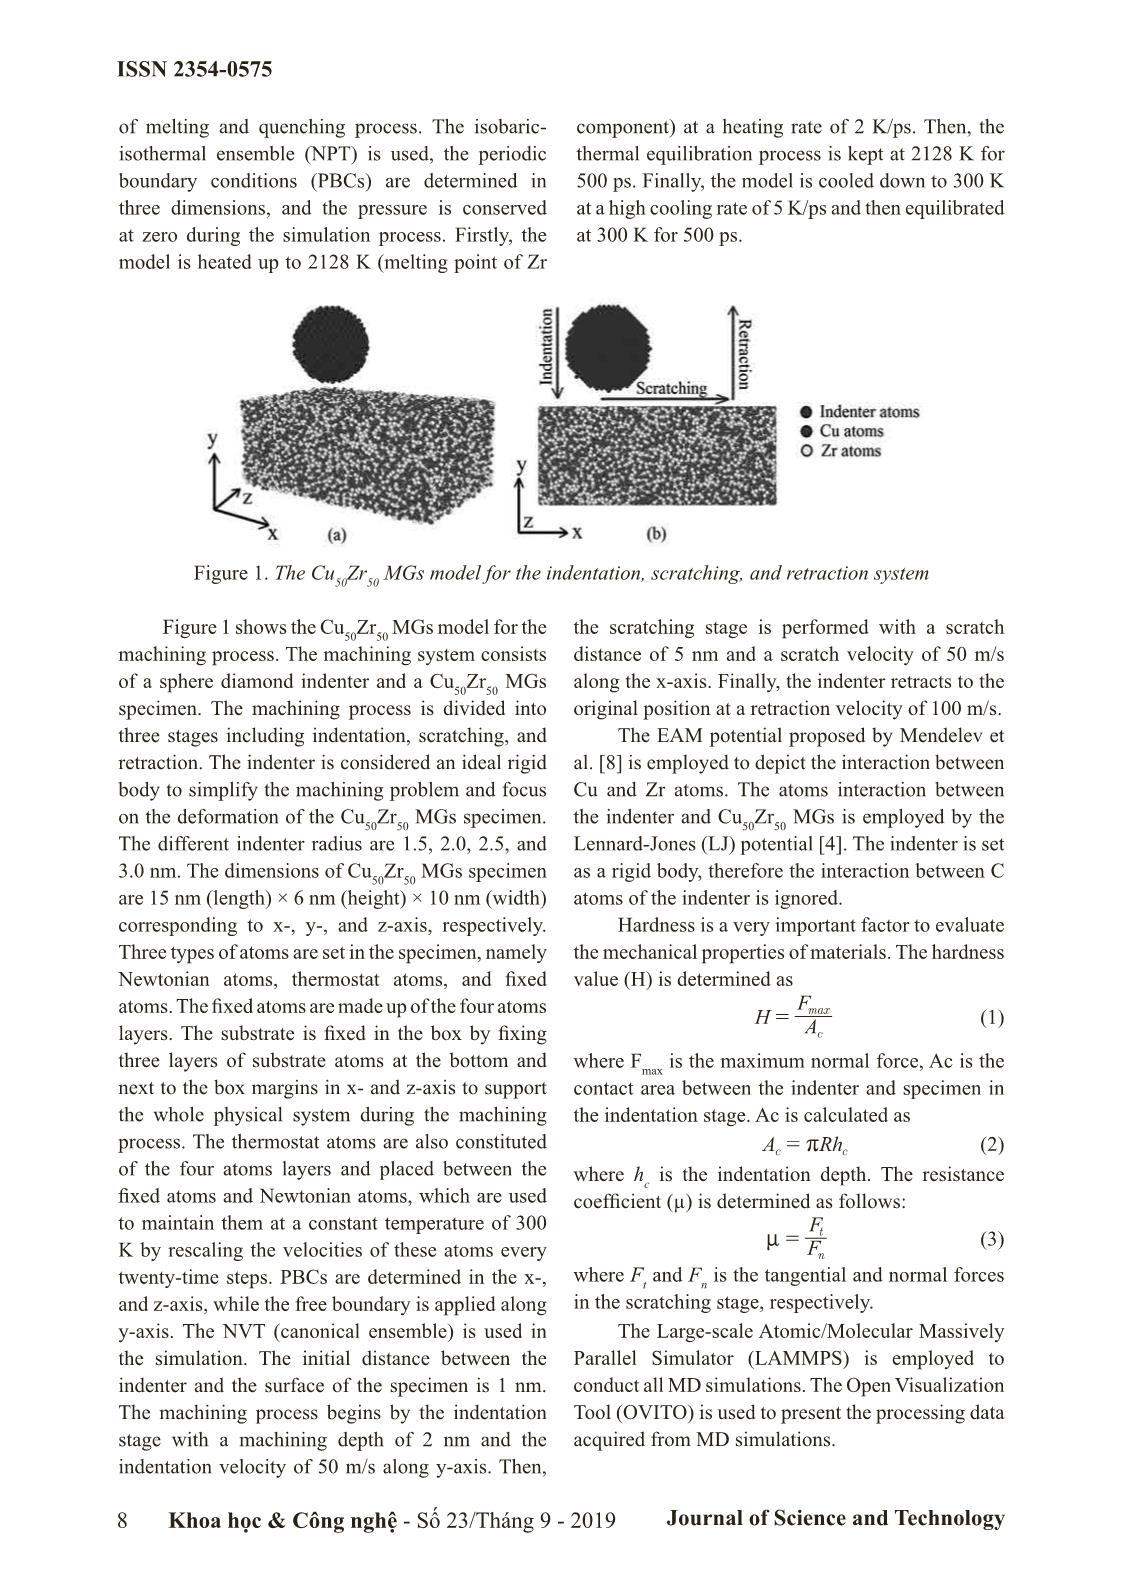
3. Results and discussion in Figure 2(b). It means that increasing indenter
3.1. Dynamic response of Cu50Zr50 MGs radius clearly affects the indentation and scratching
 Figure 2(a) shows the lateral cross-sectional characteristics of Cu50Zr50 MGs. As the indenter
view of the pile-up and groove formed after the radius is relatively bigger, the contact area between
retraction of the indenter for the different indenter indenter and substrate is larger leads to groove
radius. The shear strain focuses more intensely in zone is larger. The materials around the indenter
the case of smaller indenter radius. This indicates are concentrated and then obviously emerge on the
that the plastic deformation is more severe with a surface with a smaller indenter radius, which are
smaller indenter radius. Machining zone and pile- spread around the machining zone with a bigger
up height significantly decrease as the increasing indenter radius. So, the pile-up height on the surface
indenter radius. Corresponding, the chipping is lower with a bigger radius of indenter in the
volume is also clearly larger and more chippings machining process.
are generated around the groove, which can be seen
Figure 2. (a) The lateral cross-sectional-view of the pile-up and groove formed after the retraction of the
 indenter and (b) the surface morphology of Cu50Zr50 MGs for the different indenter radius.
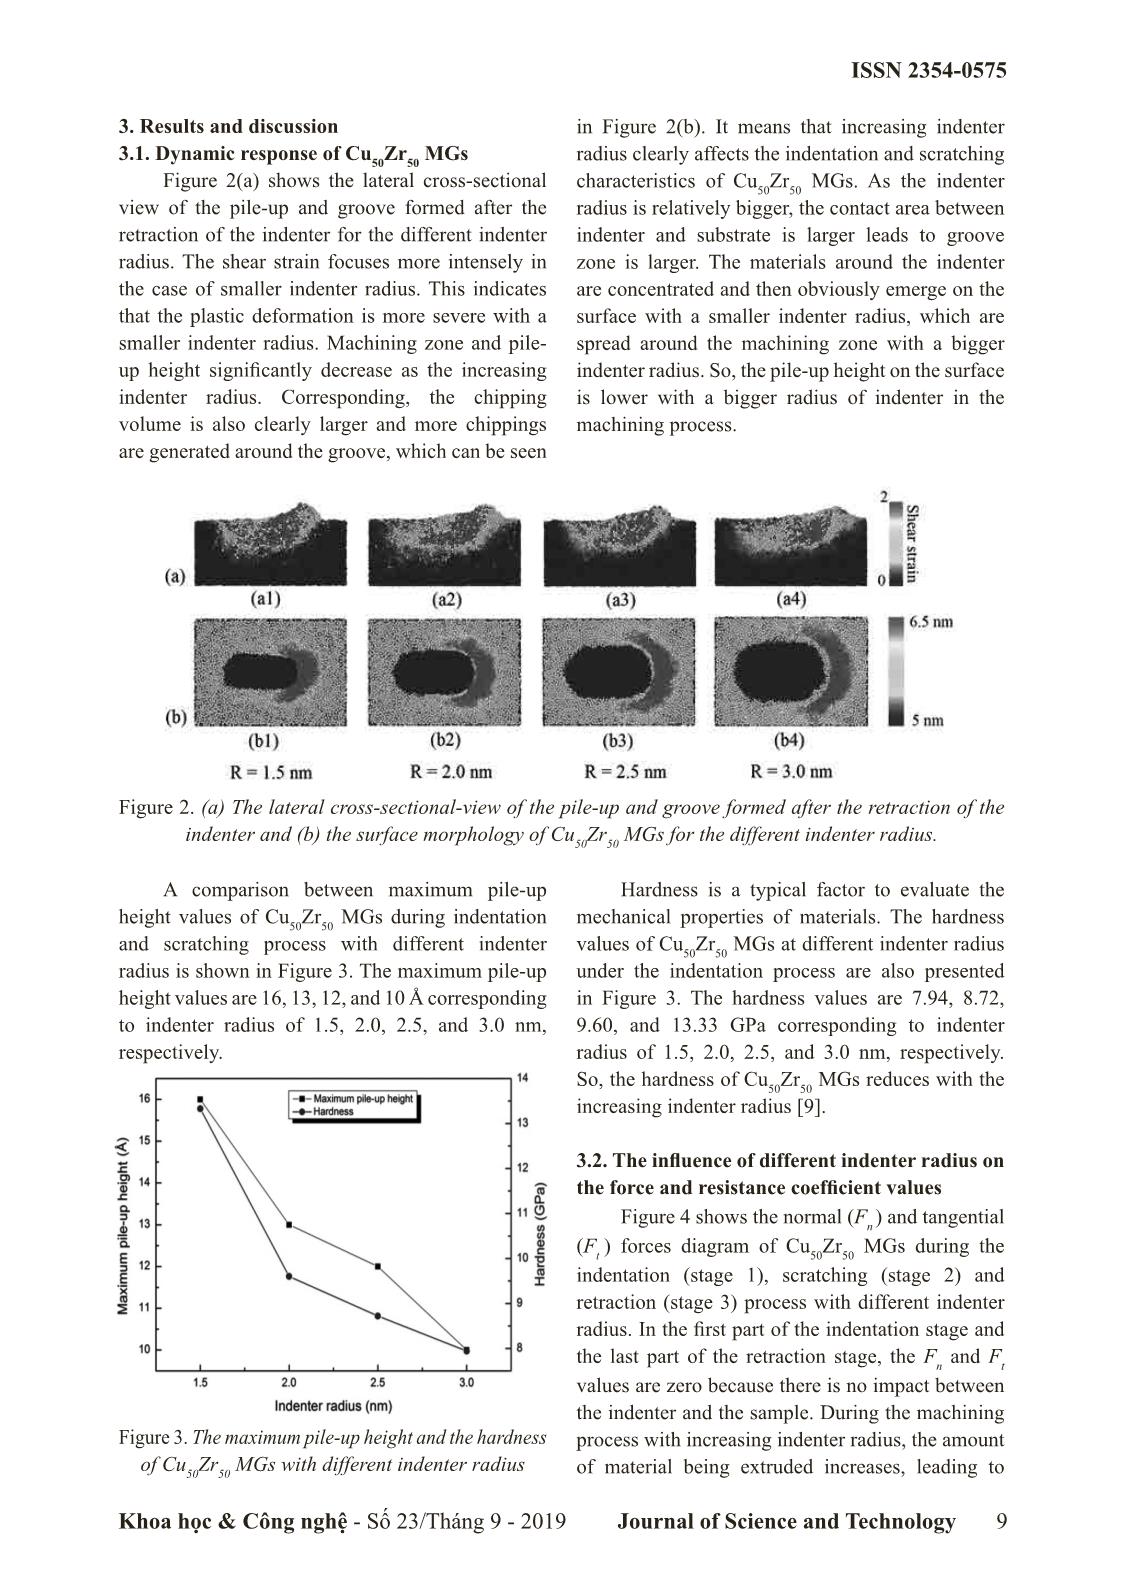
 A comparison between maximum pile-up Hardness is a typical factor to evaluate the
height values of Cu50Zr50 MGs during indentation mechanical properties of materials. The hardness
and scratching process with different indenter values of Cu50Zr50 MGs at different indenter radius
radius is shown in Figure 3. The maximum pile-up under the indentation process are also presented
height values are 16, 13, 12, and 10 Å corresponding in Figure 3. The hardness values are 7.94, 8.72,
to indenter radius of 1.5, 2.0, 2.5, and 3.0 nm, 9.60, and 13.33 GPa corresponding to indenter
respectively. radius of 1.5, 2.0, 2.5, and 3.0 nm, respectively.
 So, the hardness of Cu50Zr50 MGs reduces with the
 increasing indenter radius [9].
 3.2. The influence of different indenter radius on
 the force and resistance coefficient values
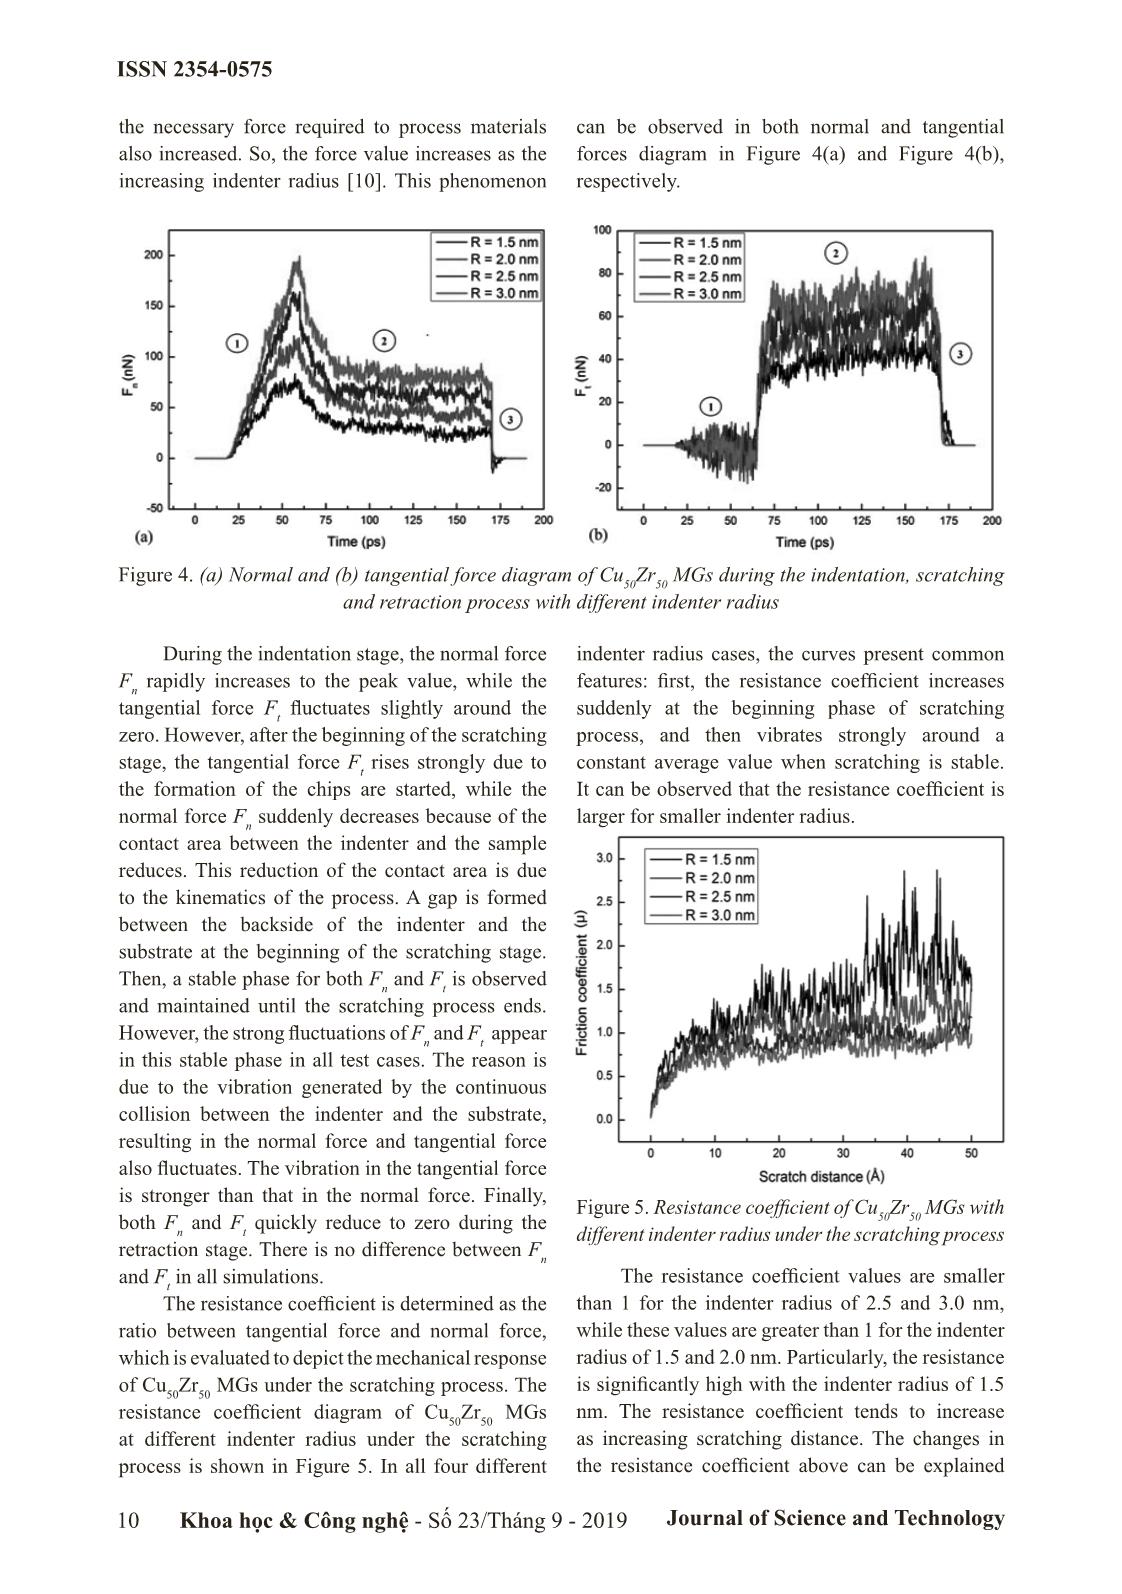
 Figure 4 shows the normal (Fn ) and tangential
 (Ft ) forces diagram of Cu50Zr50 MGs during the
 indentation (stage 1), scratching (stage 2) and
 retraction (stage 3) process with different indenter
 radius. In the first part of the indentation stage and
 the last part of the retraction stage, the Fn and Ft
 values are zero because there is no impact between
 the indenter and the sample. During the machining
Figure 3. The maximum pile-up height and the hardness process with increasing indenter radius, the amount
 of Cu50Zr50 MGs with different indenter radius of material being extruded increases, leading to
Khoa học & Công nghệ - Số 23/Tháng 9 - 2019 Journal of Science and Technology 9
ISSN 2354-0575
the necessary force required to process materials can be observed in both normal and tangential
also increased. So, the force value increases as the forces diagram in Figure 4(a) and Figure 4(b),
increasing indenter radius [10]. This phenomenon respectively.
Figure 4. (a) Normal and (b) tangential force diagram of Cu50Zr50 MGs during the indentation, scratching
 and retraction process with different indenter radius
 During the indentation stage, the normal force indenter radius cases, the curves present common
Fn rapidly increases to the peak value, while the features: first, the resistance coefficient increases
tangential force Ft fluctuates slightly around the suddenly at the beginning phase of scratching
zero. However, after the beginning of the scratching process, and then vibrates strongly around a
stage, the tangential force Ft rises strongly due to constant average value when scratching is stable.
the formation of the chips are started, while the It can be observed that the resistance coefficient is
normal force Fn suddenly decreases because of the larger for smaller indenter radius.
contact area between the indenter and the sample
reduces. This reduction of the contact area is due
to the kinematics of the process. A gap is formed
between the backside of the indenter and the
substrate at the beginning of the scratching stage.
Then, a stable phase for both Fn and Ft is observed
and maintained until the scratching process ends.
However, the strong fluctuations ofF n and Ft appear
in this stable phase in all test cases. The reason is
due to the vibration generated by the continuous
collision between the indenter and the substrate,
resulting in the normal force and tangential force
also fluctuates. The vibration in the tangential force
is stronger than that in the normal force. Finally,
 Figure 5. Resistance coefficient of Cu Zr MGs with
both F and F quickly reduce to zero during the 50 50
 n t different indenter radius under the scratching process
retraction stage. There is no difference between Fn
and Ft in all simulations. The resistance coefficient values are smaller
 The resistance coefficient is determined as the than 1 for the indenter radius of 2.5 and 3.0 nm,
ratio between tangential force and normal force, while these values are greater than 1 for the indenter
which is evaluated to depict the mechanical response radius of 1.5 and 2.0 nm. Particularly, the resistance
of Cu50Zr50 MGs under the scratching process. The is significantly high with the indenter radius of 1.5
resistance coefficient diagram of50 Cu Zr50 MGs nm. The resistance coefficient tends to increase
at different indenter radius under the scratching as increasing scratching distance. The changes in
process is shown in Figure 5. In all four different the resistance coefficient above can be explained
10 Khoa học & Công nghệ - Số 23/Tháng 9 - 2019 Journal of Science and Technology
 ISSN 2354-0575
by the influence of the indenter size. The cutting behaviors of Cu50Zr50 MGs under indentation and
dominates because most of the indenter volume scratching process are investigated by using MD
sinks in the substrate, while the sliding is prioritized simulations. The conclusions are listed as follows:
in the scratching process. This also confirms that (1) The machining zone increases, while the
the indenter radius has a significant influence on pile-up height decreases as increasing indenter
the mechanism of deformation and mechanical radius.
properties of Cu50Zr50 MGs during the machining (2) The hardness values reduce with a bigger
process [9]. radius of indenter and range from 7.94 to 13.33
 GPa.
4. Conclusion (3) The force increases, however, the resistance
 The mechanical properties and deformation coefficient decreases as the indenter radius increases.
Reference
 [1]. Wright, W. J., Liu, Y., Gu, X., Van Ness, K. D., Robare, S. L., Liu, X., ... &Dahmen, K. A.
 Experimental evidence for both progressive and simultaneous shear during quasistatic compression of
 a bulk metallic glass. Journal of Applied Physics, 2016, 119(8), 084908.
 [2]. Liu, Z. Y., Wang, G., Chan, K. C., Ren, J. L., Huang, Y. J., Bian, X. L., ... &Zhai, Q. J. Temperature
 dependent dynamics transition of intermittent plastic flow in a metallic glass. I. Experimental
 investigations. Journal of Applied Physics, 2013, 114(3), 033520.
 [3]. Hilzinger, H. Applications of metallic glasses in the electronics industry. IEEE Transactions on
 Magnetics, 1985, 21(5), 2020-2025.
 [4]. Bailey, N. P., Schiøtz, J., & Jacobsen, K. W. Simulation of Cu-Mg metallic glass: Thermodynamics
 and structure. Physical Review B, 2004, 69(14), 144205.
 [5]. Wang, Y., Zhang, J., Wu, K., Liu, G., Kiener, D., & Sun, J. Nanoindentation creep behavior of
 Cu–Zr metallic glass films.Materials Research Letters, 2018, 6(1), 22-28
 [6]. Bhatia, M. A., Rajagopalan, M., Darling, K. A., Tschopp, M. A., & Solanki, K. N. The role of Ta
 on twinnability in nanocrystalline Cu–Ta alloys. Materials Research Letters, 2017, 5(1), 48-54.
 [7]. Kazanc, S. Molecular dynamics study of pressure effect on crystallization behaviour of amorphous
 CuNi alloy during isothermal annealing. Physics Letters A, 2007, 365(5-6), 473-477.
 [8]. Ye, Y., Yang, X., Wang, J., Zhang, X., Zhang, Z., & Sakai, T. Enhanced strength and electrical
 conductivity of Cu–Zr–B alloy by double deformation–aging process. Journal of Alloys and
 Compounds, 2014, 615, 249-254.
 [9]. Zhu, P. Z., Hu, Y. Z., Wang, H., & Ma, T. B. Study of effect of indenter shape in nanometric
 scratching process using molecular dynamics. Materials Science and Engineering: A, 2011, 528(13-
 14), 4522-4527.
 [10]. AlMotasem, A. T., Bergström, J., Gåård, A., Krakhmalev, P., & Holleboom, L. J. Atomistic
 insights on the wear/friction behavior of nanocrystalline ferrite during nanoscratching as revealed by
 molecular dynamics. Tribology letters, 2017, 65(3), 101.
 ẢNH HƯỞNG CỦA BÁN KÍNH DỤNG CỤ ĐẾN TÍNH CHẤT CƠ HỌC
 VÀ HIỆN TƯỢNG BIẾN DẠNG CỦA HỢP KIM VÔ ĐỊNH HÌNH Cu50Zr50
 TRONG QUÁ TRÌNH TẠO LÕM VÀ CÀO XƯỚC
Tóm tắt:
 Trong bài báo này, sự kết hợp giữa quá trình tạo lõm và cáo xước được thực hiện để phân tích cơ chế
biến dạng và các tính chất cơ học của hợp kim vô định hình Cu50Zr50 sử dụng phương pháp mô phỏng động
lực học phân tử. Cơ chế biến dạng và các tính chất cơ học của hợp kim vô định hình Cu50Zr50 được đánh
giá thông qua hình thái bề mặt, chiều cao vật liệu bị đùn lên, độ cứng, lực và hệ số cản trong quá trình mô
Khoa học & Công nghệ - Số 23/Tháng 9 - 2019 Journal of Science and Technology 11
ISSN 2354-0575
phỏng. Các ảnh hưởng của giá trị bán kính dụng cụ khác nhau được phân tích rất rõ ràng. Kết quả cho
thấy rằng vùng biến dạng tăng lên với bán kính dụng cụ lớn hơn. Chiều cao vật liệu bị đùn lên và độ cứng
giảm khi bán kính dụng cụ tăng lên. Giá trị độ cứng đạt được trong khoảng từ 7.94 đến 13.33 GPa. Lực tác
dụng tăng lên, tuy nhiên, hệ số cản giảm xuống khi bán kính dụng cụ tăng lên.
Từ khóa: Hợp kim vô định hình Cu50Zr50 ; quá trình tạo lõm; quá trình cào xước; hệ số cản.
12 Khoa học & Công nghệ - Số 23/Tháng 9 - 2019 Journal of Science and Technology
File đính kèm:
 effects_of_indenter_radius_on_mechanical_properties_and_defo.pdf

